Tutorial 12
For this tutorial, we had to start from scratch and disassemble our breadboard. This tutorial introduced the seven segment display which we hadn't used before. A seven segment display is commonly used in scoreboards, as they are relatively simple and display numbers very efficiently. A seven segment display is broken into seven segments, as shown below:
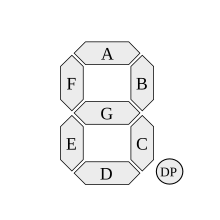
This was actually quite a difficult task as we had to individually each of the seven segments of the display. The code was also quite difficult, as we had to individually test and name each segment according to the diagram above. Here is our seven segment display in its testing program:
Tutorial 13:
In this tutorial we were given a code challenge using the seven segment display. Everything on the breadboard stayed the same. All we had to do was go on to Arduino IDE and code the seven segment display for it to show "ETHAN". This wasn't very hard because most of the code was already given to us. The only hard part about it was finding out which code turned on what section on the seven segment display. Once we figured that out, it was as easy as solving a second grade math equation. We made it blink each letter one by one for about a second until it completed spelled out "ETHAN". This didn't take us very long either.
Tutorial 14:
This tutorial was similar to the coding challenge given in tutorial 13. Instead of having to code the seven segment display to spell out "ETHAN", it now had to be programmed to count from 0 to 3. Everything on the breadboard stayed the same and most of the code stayed the same. We barely even modified the code. The only hard part about this challenge was finding out which code turned on what section on the seven segment display all over again. But after this was done it was very simple to complete. Each number blinked for about 1 second each until it finished counting. It was on a loop so it kept counting on and on.This didn't take us very long to finish at all.
No comments:
Post a Comment